Welcome to the RRR August Blog Hop.
If you arrived here from Linda’s awesome blog, you are on the right track. If not, why not head back to the RRR Blog and start from the beginning so you don’t miss any of the terrific projects.
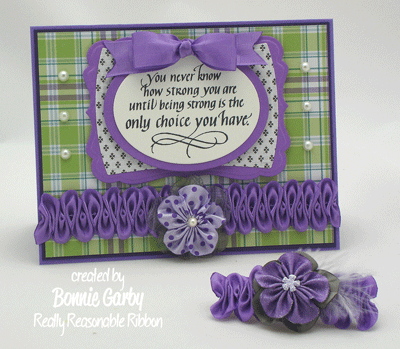
This month the Really Reasonable Ribbon Monthly Ribbon Club Assortment is a great mix of grape and grey. I am a big fan of purple and I just love this combo! Well, since I put the assortment together, I guess that’s a given. 🙂 This month includes 8 fun styles and a total of 16 yards of ribbon.

So, I was brainstorming for something new to do, and I remembered this fun gathered ribbon I saw a while back. No better time than the present to give it a try.
Great look, huh!!!
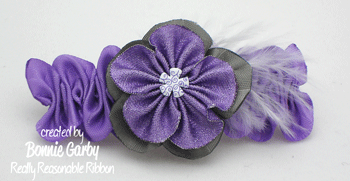
When I was making the gathered ribbon piece for the card I realized it would be a great look for a hair clip too, so I made an extra short piece of gathered ribbon.
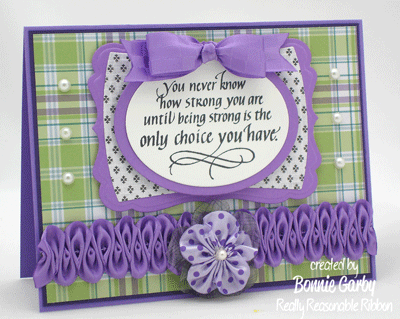
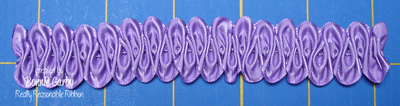
I added a pretty ribbon flower made from the satin swiss dots and sheer grey crosshatch ribbon from the monthly assortment. The bow and the gathered ribbon strip is made using the grape checkerboard ribbon.

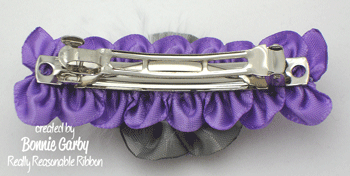
The little hair clip is a 3-1/2″ piece of gathered ribbon glued to a 60mm french clip. I topped it with a pretty ribbon flower made using the metal grey checkerboard satin and the grape shimmer satin. It’s topped with a cute brad and I added a tiny piece of white feather behind it.
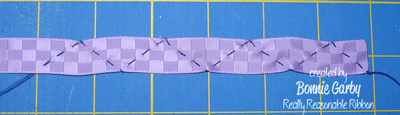
Here is a quick tutorial on how I gathered the ribbon.
1. You will need a piece of ribbon approximately 4-5 times the length of your finished piece. It really depends how tight you want the gathers to be. For the card I started with a 20″ piece of ribbon to end up with a piece approximately 5-1/2″ wide. Be sure to seal the ends of the ribbon with either a lighter or fray-check before you begin. Since I selected the checkerboard ribbon, I did not make any marks on my ribbon. I just followed the check pattern on the ribbon. If you use a plain ribbon, just mark your ribbon evenly across the width so your gathers will be even. Stitch in a zig zag pattern all the way across your ribbon length. Be sure to keep your stitches neat and uniform in length. This will give you a better finished look. (For your piece, select a thread that matches your ribbon. I used the dark blue so you could see my stitches.)

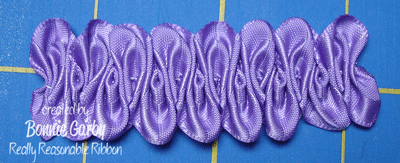
3. Once your have the ribbon gathered to the fullness you desire, take a few small stay-stitches at the end, on the back. Bury both ends of the thread in the back of the piece.
This is the finished piece for the french clip which I attached using E6000 glue.
This is the finished piece for my card. I adhered the gathered ribbon to my card using 1/2″ Scor-Tape.
And these are the finished pieces.

Wow, I just love that ribbon idea. It made your card look gorgous. Thanks for the wonderful idea.
marg0006 at verizon dot net
I LOVE the gathered ribbon and love that you gave us instructions! Your card is beautiful! Thanks so much!
WOW … you really know your way around ribbon crafting. What FUN projects. And what a delightful blog you have … I am now a follower! Thanks for sharing!
These are so pretty. I can't wait to try this. I am so stingy with my ribbon, I have to learn to let go!! Maybe you have inspired me!!
Beautiful card and hair piece. I love how you made the ribbon and showed us how you did it. Always learning something. Love it.
Great card. Love the way you nused the ribbon
Vicky
Every month, I think, she cannot top last month, and then you do. You so totally rock!
You gathered the ribbon different, I'll have to try this the next time I want gathers. TFS,
Unique ideas for the usage of ribbon! The color is captivating.
WOW!! Ur projects are simply gorgeous!! loving all the purple